Rainy Day Craft Ideas: Fun Projects for All Ages
March 4, 2025

Embracing the Drizzle: Unleashing Your Indoor Creativity
Rainy days often feel like a creativity dampener. Stuck inside, gazing out at the dreary weather, it's easy to succumb to boredom. But what if those gray skies actually hold the key to a burst of vibrant indoor fun?
Historically, people have turned to creative pursuits during periods of confinement, turning limitations into opportunities. From the intricate knot work of sailors at sea to the elaborate needlepoint of Victorian ladies during long winters, crafting has always been a powerful antidote to boredom and a catalyst for self-expression.
What makes these activities so effective? The combination of focused attention, tactile engagement, and the satisfaction of creating something tangible provides a deeply rewarding experience, no matter your skill level.
Modern Crafts for Rainy Days
This collection of rainy day craft ideas builds on that tradition, offering a modern spin on classic crafts and introducing exciting new projects for all ages and interests.
- For Parents: Discover engaging activities for restless kids.
- For Teachers: Find inspiration to spice up lesson plans.
- For Therapists: Explore artistic expression with clients.
- For Stressed Adults: Unwind with a relaxing creative outlet.
- For Budding Entrepreneurs: Spark creative inspiration.
Transform those rainy days from dreary to delightful. Unlock your inner artist, ignite your imagination, and embrace the drizzle!
Paper Mache Weather Mobiles: A Rainy Day Delight
This charming craft is a wonderful way to add a touch of whimsy to any gloomy day. Building a paper mache weather mobile allows you to bring the outdoors in, creating a hanging display of clouds, raindrops, lightning bolts, and suns. It’s a fun project that combines art, science, and a touch of magic.
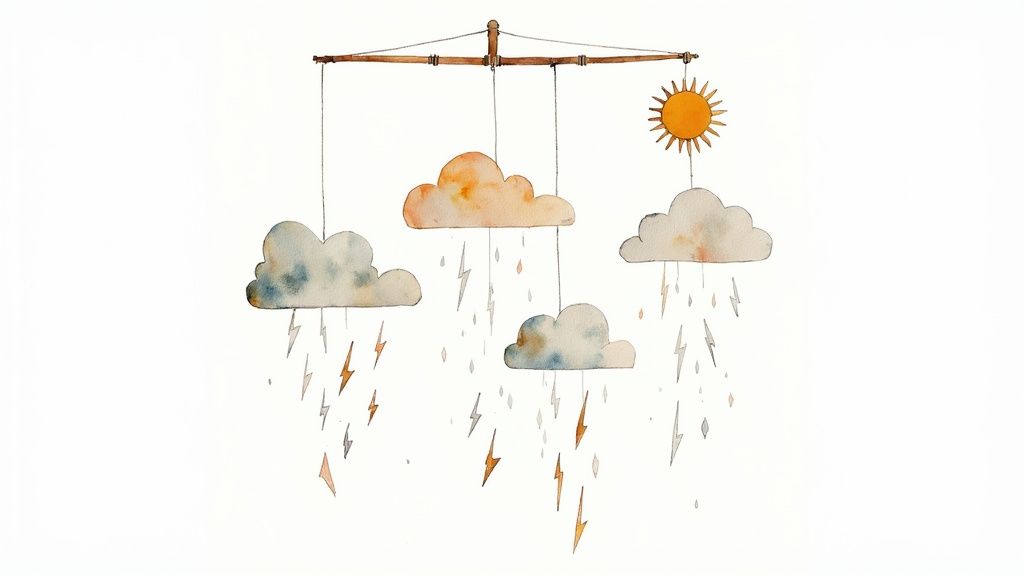
The process involves dipping newspaper strips into a flour-and-water paste and shaping them into weather-themed forms. After drying, these miniature sculptures can be painted and hung from a frame. A coat hanger or even crossed sticks work perfectly! This activity is adaptable for all ages and skill levels. Younger children can create simple shapes and use bold colors, while older kids and adults can explore more intricate designs and detailed painting techniques. For further creative inspiration, take a look at our guide on Creative Expression Activities.
Adapting the Craft for Different Settings
The beauty of this craft is its versatility. Imagine a classroom mobile designed as part of a science lesson, complete with labeled cloud types. Or picture a nursery decorated with pastel-colored weather elements, fostering a soothing environment. Even seasonal home décor can benefit – think Halloween ghosts amongst stormy clouds or snowflakes drifting below a winter sun.
The History and Benefits of Paper Mache
While paper mache has existed for centuries, its use in creating weather mobiles is more recent. Its popularity grew as parents and educators searched for engaging educational activities using readily available materials. The low cost of the project (mainly newspaper, flour, and water), combined with its educational value, has made it a rainy day favorite.
Pros and Cons of Paper Mache Weather Mobiles
Here's a quick overview of the advantages and disadvantages of this craft:
Pros:
- Low-cost materials (mostly household items)
- Adaptable for different age groups
- Keeps children entertained for hours
- Teaches basic physics principles through balancing
- Uses recycled materials
- Customizable colors and shapes
- Educational about weather
Cons:
- Requires 24-48 hours of drying time
- Can be messy
- Younger children require supervision
Tips for a Successful Project
Follow these tips to make your paper mache project a success:
- Mold Prevention: Add a tablespoon of salt to your paste.
- Faster Drying: Use a hair dryer on low to speed up drying.
- Prep Work: Pre-cut newspaper strips to avoid interruptions.
- Easy Cleanup: Work on wax paper.
The paper mache weather mobile is a fantastic blend of creativity, learning, and fun. It encourages exploration, promotes understanding of the natural world, and results in a unique, personalized creation.
Rain Cloud in a Jar: A Fun and Educational Science Experiment

This Rain Cloud in a Jar activity is more than just a craft; it’s a fascinating science experiment perfect for a rainy day. It’s a fantastic way to introduce children (and refresh your own memory) about the water cycle and how rain is formed. All you need is a simple glass jar! Its blend of entertainment and education makes it a worthwhile activity for both parents and children.
This experiment essentially creates a miniature atmosphere within a jar. Shaving cream acts as the cloud, and drops of food coloring represent condensed water vapor. As the “water vapor” becomes heavier, it falls through the “cloud” into the water below, mimicking real rainfall. This visual representation makes the concept of precipitation easy to understand, especially for younger children who learn best through tactile and visual experiences.
This activity’s popularity has grown thanks to science educators like Steve Spangler and platforms like National Geographic Kids and Pinterest. These resources have brought engaging science experiments into homes and classrooms, making science accessible and enjoyable for everyone. It's a great example of how a simple experiment can become a widely used educational tool.
The Science Behind the Rain
Here’s a breakdown of the science: The shaving cream represents a cloud, composed of tiny water droplets or ice crystals. The food coloring symbolizes the water vapor that condenses inside the cloud. When enough water vapor accumulates, the cloud can no longer hold it, and it falls as rain.
Features and Benefits
- Visual Learning: The experiment offers a tangible way to understand abstract weather concepts.
- Scientific Demonstration: Witness the water cycle in a simplified, clear format.
- Repeatable Experiment: The activity can be repeated multiple times to reinforce learning.
- Creative and Educational: This combines art and science in an engaging way.
Pros and Cons
Pros:
- Easy Setup: You probably already have the necessary materials at home.
- Visual Appeal: Watching the colored “rain” fall through the cloud is captivating.
- Educational Value: Teaches about the water cycle and rain formation.
- Kid-Friendly: Simplifies complex concepts for younger learners.
Cons:
- Temporary Activity: The experiment is short-lived, but the learning experience remains.
- Limited Creativity: While fun, there isn't much room for artistic variation.
- Potential Mess: Food coloring can stain, so supervision is recommended.
Tips for Success
- Jar Selection: Use a clear glass jar with straight sides for optimal viewing.
- Shaving Cream: White shaving cream (not gel) works best for mimicking a cloud.
- Enhanced Visuals: Add glycerin to the food coloring for slower, more visible "rainfall".
- Background: Place the jar on a white surface to make the colors stand out.
This Rain Cloud in a Jar Science Craft provides a unique and engaging way to learn about weather. Whether you're a parent, teacher, or just looking for a fun activity, this experiment is a great choice. It’s a perfect demonstration of how learning can be both enjoyable and informative!
Raindrop Suncatchers
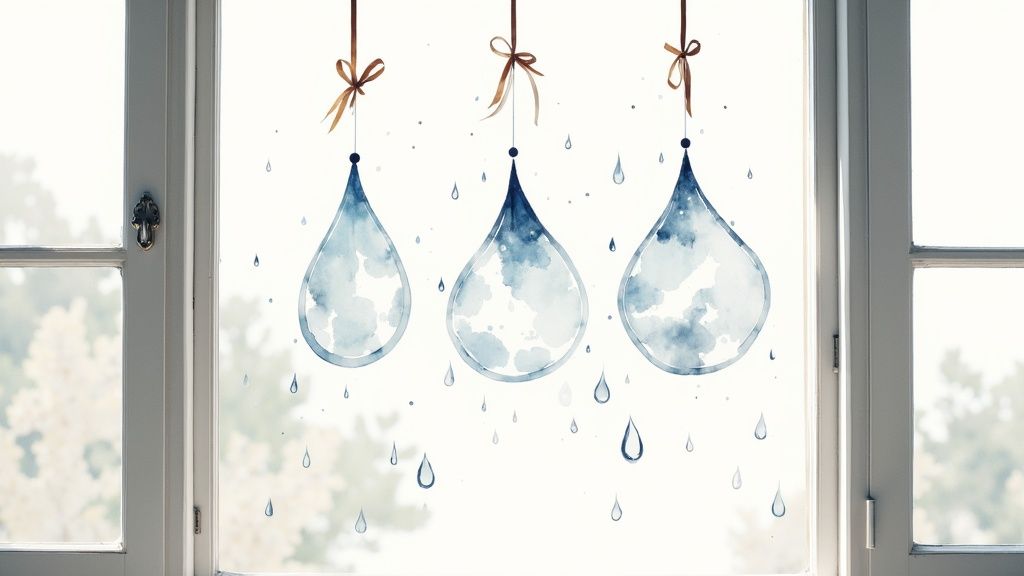
Raindrop suncatchers add a touch of magic to any window, especially during dreary weather. These translucent, raindrop-shaped decorations catch and reflect light, creating a cheerful ambiance. Their simple design makes them an ideal rainy day activity for all ages and skill levels.
What makes these suncatchers so special? Their simplicity and adaptability. The basic materials—contact paper, tissue paper, and maybe some ribbon or other embellishments—are easy to find and inexpensive. This makes them a budget-friendly project and a perfect way to repurpose leftover craft supplies. You can achieve stunning results with minimal materials, making this an excellent choice for parents, teachers, and anyone looking for a quick and rewarding craft.
Creating raindrop suncatchers is a fun and engaging process. Children can express their creativity through different color combinations and tissue paper arrangements, while adults may find the process relaxing. The translucent nature of the finished product captures the light beautifully, turning ordinary windows into vibrant displays of color. Imagine a preschool classroom decorated with these suncatchers during a weather lesson—it instantly livens up the learning environment! They also make wonderful seasonal decorations for your home, adding a touch of spring’s freshness. Family craft blogs, like The Artful Parent, frequently feature these versatile crafts, showcasing their appeal to all ages.
The History of Raindrop Suncatchers
The popularity of raindrop suncatchers stems from their use in educational settings, especially Montessori classrooms and early childhood programs. The hands-on aspect of creating them aligns with these educational philosophies, fostering creativity, developing fine motor skills, and encouraging an appreciation for nature. From classrooms, their popularity spread through craft blogs and social media, solidifying their status as a beloved rainy day activity.
Tips for Creating Raindrop Suncatchers
- Cut the contact paper larger than needed: This provides extra handling room and prevents sticky fingers from touching the adhesive.
- Sticky side up: Place your tissue paper pieces on the sticky side of one sheet of contact paper. Then, cover with the second sheet to seal your design.
- Smooth it out: Use a credit card or a similar flat object to remove air bubbles and ensure a tight seal.
- Hang it up: Attach a ribbon loop to the top of your raindrop before sealing it for easy hanging.
Pros and Cons
Here’s a quick overview of the advantages and disadvantages:
| Pros | Cons |
|---|---|
| Quick to make | Contact paper may lose stickiness |
| No special tools required | Limited durability with only tissue paper |
| Minimal mess | May not adhere well in high humidity |
| Readily available materials |
Raindrop suncatchers earn a spot on this list because they offer a wonderful blend of simplicity, creativity, and visual appeal. They are an excellent activity for individuals, families, and educators, providing a fun and engaging experience with beautiful results. Next time the rain is falling, gather your supplies and bring the sunshine in with these charming raindrop suncatchers!
Sock Puppet Weather Friends

Sock puppet weather characters offer a fun way to brighten a rainy day. This craft combines upcycling and imaginative play, making it enjoyable for both kids and grown-ups. Give old socks new life as whimsical weather phenomena.
Imagine fluffy rain clouds with dangling felt raindrops. Picture a bright yellow sun with fabric rays. Perhaps even create mischievous wind characters with flowing ribbons. And the fun doesn't stop with the crafting; these puppets unlock a world of play possibilities.
This craft's adaptability is a key feature. Keep it simple with basic materials like buttons, felt scraps, and glue. Or, add complexity with sewing and intricate details. This flexibility makes it suitable for various ages and skill levels. Younger children can enjoy simpler designs with adult guidance, while older kids can embrace more challenging projects.
Features and Benefits
- Upcycling: Give old socks a new purpose!
- Interactive Play: The real fun begins after crafting, fostering imaginative play and storytelling.
- Storytelling Tool: These puppets become characters in weather-themed stories, helping kids grasp and express weather concepts.
- Customization: From sunshine to storms, the options are endless!
Pros and Cons
Let's take a look at the advantages and disadvantages of this fun activity.
Pros:
- Uses Common Household Items: Most materials are readily available at home.
- Encourages Imagination: Sparks creativity and storytelling abilities.
- Adaptable Complexity: Suitable for different ages and skill levels.
- Introduces Sewing Skills: Can subtly introduce older children to sewing basics.
Cons:
- Needs Basic Craft Supplies: While many are at home, you may need felt, glue, or buttons.
- Small Parts Safety: Button eyes or small parts are not safe for very young children. Supervision is essential.
- Glue Gun Safety: Adult supervision is required when using a hot glue gun.
Real-World Applications
These puppets extend beyond home playtime. They hold educational and therapeutic value.
- Classrooms: Use them to act out weather reports or explore different climates.
- Therapy: Creating a friendly rain cloud puppet can help children address storm-related fears.
- Vocabulary Building: Bring terms like sunny, cloudy, windy, and rainy to life.
Helpful Tips
Here are a few tips to get you started.
- Color Coordination: Use gray or blue for rain clouds, yellow for the sun, and white or light blue for wind.
- Easy Attachment: Safety pins can replace sewing for attaching features.
- Add Personality: Googly eyes bring instant character!
- DIY Stage: A cardboard box makes a great puppet show stage.
A Bit of History
Sock puppets have a rich history in education and entertainment. Shows like 'Mr. Rogers' Neighborhood' popularized puppets to connect with children. Educational puppeteers and librarians have long used them for storytelling and engagement. This craft continues that tradition, bringing puppetry's power into homes.
This craft is perfect for a rainy day, blending creativity, learning, and fun. It's a chance to transform a gloomy day into an imaginative adventure. Gather your socks and start the show!
Turn your kid into the star of the page
Upload one photo and get coloring pages of your own child. Print as many as you like.
Recycled Umbrella Art
Got a broken umbrella gathering dust in a corner? Don't throw it away! Recycled umbrella art presents a fantastic opportunity to transform that discarded rain shield into something both beautiful and functional. This craft ingeniously blends environmental awareness with a unique rainy-day theme, making it a perfect addition to our rainy-day craft ideas. It's an excellent way to teach resourcefulness and explore the unusual properties of these materials, resulting in unique creations you won't find anywhere else.
The real charm of umbrella art lies in its versatility. You can create anything from simple projects for children to more intricate pieces for experienced crafters. The waterproof fabric can be repurposed into shapes for appliqués, integrated into collages, or even stitched into waterproof tote bags! The metal ribs and frame, often the first parts to be discarded, can find new life as structural elements in mobiles, sculptures, or even whimsical garden art.
Real-World Inspiration
Imagine whimsical garden mobiles gently chiming in the breeze, constructed from umbrella ribs decorated with beads and found objects. Picture vibrant wall art showcasing umbrella fabric stretched over canvas frames, producing abstract patterns and splashes of color. Visualize a stylish lampshade crafted from the translucent canopy of a discarded umbrella, emitting a soft, diffused light. These aren't just theoretical concepts. Artists like Rachael Taylor and various environmental craft movements, notably in Japan with their concept of 'mottainai' (waste reduction), have demonstrated the remarkable possibilities of upcycled umbrella art. Japanese fabric artists, in particular, have masterfully explored the textural and waterproof qualities of umbrella fabric, incorporating it into traditional crafts with breathtaking results.
Why This Craft Makes the List
This craft provides a distinct blend of creativity and practicality. It taps into the upcycling movement, championing environmental responsibility while also igniting imagination. The waterproof and adaptable nature of umbrella fabric lends itself to a variety of applications, appealing to different skill levels and artistic interests. It's a win-win for both the planet and your creative spirit.
Pros & Cons
| Pros | Cons |
|---|---|
| Environmentally friendly: Reduces waste | Requires a broken umbrella: Need to source one |
| Unique material properties: Offers creative possibilities | Some parts can be tricky: Working with metal components |
| Distinctive end results: One-of-a-kind creations | Precise fabric cutting can be difficult: Slippery fabric |
| Teaches resourcefulness: Encourages innovative thinking |
Tips for Upcycling Success
- Disassembly: Carefully take apart the umbrella using wire cutters and scissors.
- Cleaning: Hand wash the fabric to remove any dirt or debris before starting your project.
- Cutting: Sharp fabric scissors designed for synthetic materials are essential for clean cuts.
- Safety First: Smooth any sharp edges on the metal components with sandpaper or a file before crafting.
Whether you're a parent looking for an engaging activity with children, an experienced crafter seeking a new challenge, or simply someone passionate about making a positive environmental impact, recycled umbrella art is well worth exploring. Unleash your creativity and see what remarkable creations you can bring to life from a simple discarded rain protector!
Bringing the Outdoors In: A Rainy Day Nature Collage
Have a rainy day blues? Turn that frown upside down with a fun and engaging nature collage project! This activity is a perfect way to transform nature's treasures into beautiful, personalized artwork. The "Indoor Nature Collage from Rainy Day Collections" involves gathering natural elements. Think leaves glistening with raindrops, vibrant flower petals, interesting twigs, and even small stones or feathers. These finds, collected before, during, or after a rain shower, are then preserved and arranged into a stunning collage, capturing the essence of a rainy day.
This project goes beyond simple arts and crafts. It's about connecting with nature on a deeper level, even when the weather keeps you indoors. It encourages observation skills as everyone actively seeks out interesting natural elements. Imagine it as a scavenger hunt with an artistic twist! The resulting collage becomes a tangible memory, fostering a sense of appreciation for the natural world.
Benefits of a Nature Collage
- Connection with Nature: Bridges the gap between indoors and the natural world.
- Sensory Exploration: Engaging with various textures and smells adds a new dimension to the activity.
- Skill Development: Learning preservation techniques, like pressing and drying flowers and leaves, teaches valuable skills.
- Seasonal Record: Creates a visual diary of nature's changes throughout the year.
Pros and Cons
Let's take a look at the advantages and disadvantages of this rainy day activity.
| Pros | Cons |
|---|---|
| Connects children with nature indoors | Requires collecting during dry periods as well |
| Free or very low-cost materials | Natural materials may deteriorate over time |
| Encourages observation skills | Some items may mold if not dried properly |
| Creates lasting memories of the seasons |
Inspiration and Real-World Examples
Picture framed pressed flower and leaf arrangements decorating a child's bedroom wall. Visualize a nature journal filled with pressed specimens and handwritten observations about the changing seasons. These collages can even become beautiful botanical-themed home decor. The possibilities are truly endless!
The increasing popularity of nature journaling and the philosophies of environmental educators like Joseph Cornell and practitioners of the Forest School philosophy have contributed to the growth of this activity. These approaches emphasize direct experiences in nature and finding creative ways to document and appreciate the natural world.
Practical Tips for Creating Your Collage
- Pressing: Press collected items between heavy books lined with newspaper or blotting paper for one to two weeks.
- Preserving: Mod Podge or a similar sealant can help preserve delicate items and give the finished piece a professional touch.
- Documenting: Capture the collection process with photos to include in the final display.
- Adding Context: Encourage children to add written observations, poems, or stories about the rainy day or the collected items.
Why This Activity Stands Out
This activity uniquely combines art, nature, and mindfulness in a simple yet profound way. It’s a multi-sensory experience that fosters appreciation for the natural world, encourages creativity, and creates a tangible reminder of the beauty present even on a rainy day. A fantastic alternative to screen time, this project promotes both creativity and a connection to nature, securing its spot on our list of rainy day craft ideas.
Creating a DIY Rain Stick: A Sensory and Musical Journey
Want to experience the tranquil sound of rain inside your home, regardless of the weather? Building a rain stick is a fun, hands-on activity that blends music, cultural exploration, and sensory engagement. This homemade version of a traditional Latin American percussion instrument recreates the sound of falling rain using a cardboard tube filled with rice, beans, or other small items. Internal obstacles, like coiled aluminum foil or small sticks, produce the characteristic rain sound as the filling trickles down when the tube is tilted.
This craft is a must-try because it offers more than just creative expression. It's a sensory experience, a cultural learning opportunity, and a customizable instrument all in one! You can control the sound by selecting various fillings—rice for a soft drizzle, beans for a heavier shower, and so on. Adding personal decorations like weather symbols or nature-inspired designs enhances the experience further.
Features and Benefits
-
Auditory Delight: The gentle cascading sound creates a calming and captivating auditory experience.
-
Cultural Exploration: The rain stick introduces children (and adults!) to the vibrant musical heritage of Latin America.
-
Sound Customization: Experimenting with different fillings lets you create various rain sounds, from a sprinkle to a downpour.
-
Craft and Instrument: This project serves as both a craft activity and a functional musical instrument.
Pros and Cons
| Pros | Cons |
|---|---|
| Creates realistic rainfall sounds | Can be loud in smaller spaces (especially with larger fillings) |
| Easy to personalize with decoration | Requires secure sealing to prevent spills |
| Introduces world music traditions | Finding the perfect internal texture for realistic rain may require experimentation |
| Engages multiple senses |
Real-World Applications
-
Educational Tool: Use rain sticks during a weather lesson in the classroom.
-
Storytelling Enhancement: Add an immersive element to storytelling sessions at home.
-
Mindfulness Aid: The gentle sound can be incredibly soothing and promote relaxation.
Tips for Building Your Rain Stick
-
Aluminum Foil Technique: Spiraling aluminum foil inside the tube produces the most authentic rain sounds.
-
Spill-Proof Sealing: Before permanently sealing the ends, use plastic wrap and rubber bands to prevent spills while experimenting.
-
Filling Exploration: Rice creates a gentle rain sound, while beans make a heavier, storm-like sound. Try other materials like small pebbles or beads!
-
Decorative Flair: Decorate the exterior with weather symbols, nature scenes, or any design you like.
From Therapy to Education
Rain sticks have gained popularity in music therapy for their calming auditory stimulation, in Waldorf education for their sensory and creative benefits, and in Latin American cultural programs. Their adaptability speaks to their lasting appeal.
By using these tips and embracing your creativity, you can create a unique and beautiful rain stick that brings the wonder of rain indoors, whenever you wish!
Watercolor Rain Art: Embracing the Unpredictable
What better way to spend a rainy day than creating art inspired by it? Watercolor rain art techniques offer a unique approach to exploring water as both a medium and a subject. These techniques use water and watercolor paints to create rain-themed images through methods like salt texturing, plastic wrap crinkling, alcohol drops, and controlled water dripping. The results are unpredictable, unrepeatable, and captivating, just like rain itself.
These techniques aren't simply about splashing paint. They delve into core watercolor principles like diffusion, color mixing, and texture creation. Imagine a moody cityscape with blurred streetlights through a salt-textured downpour. Or a vibrant abstract piece mimicking a rain-kissed puddle textured with crinkled plastic wrap. Perhaps a dramatic landscape where controlled drips create a cascading waterfall. The creative potential is vast.
One of the best aspects is the adaptability to different skill levels. Beginners can achieve stunning effects with simple salt texturing, while experienced artists can explore complex washes and controlled drips. For those wanting to delve deeper into color interactions, our guide on Color Theory for Beginners is a valuable resource.
Watercolor rain art also provides a fantastic opportunity to teach art principles through experimentation. Kids and adults can explore how different salt grain sizes create varied textures or how alcohol creates unique blooming effects. It's a playful way to understand the beauty of water and pigment.
Advantages and Disadvantages of Watercolor Rain Art
| Pros | Cons |
|---|---|
| Perfectly suited to rainy day themes | Paper can buckle if over-saturated (taping can prevent this) |
| Teaches art principles through hands-on experience | Requires watercolor paper for optimal results |
| Immediately engaging results | Some techniques require drying time between steps |
| Adaptable to various skill levels |
Tips for Creating Your Own Rain Art
- Preventing Warping: Secure your watercolor paper to a board with tape before starting.
- Salt Texture Variations: Experiment with different salt grain sizes (table salt, kosher salt, sea salt).
- Fine Mist Effects: Create the illusion of a fine mist using a spray bottle filled with water.
- Dramatic Contrast: Use white gouache on dark backgrounds for a striking rain effect.
These techniques, popularized by contemporary watercolorists like Jean Haines, embrace the fluidity of water. They are also championed by numerous online art communities and art education pioneers like Viktor Lowenfeld, who advocated for experimental art processes.
Watercolor rain art deserves recognition for its captivating blend of art and science, allowing artists to harness the unpredictable beauty of water to create unique and expressive artwork.
Splash Artwork With DIY Pendulum Painting
Get ready for some exciting action art! DIY pendulum painting blends science and art, resulting in a burst of vibrant creativity. This isn't about creating a perfect picture. It's about the thrilling process of watching paint swing and splatter, forming unique and unpredictable patterns. It's a fantastic hands-on activity for both kids and adults, subtly introducing physics and art concepts.
You create a simple pendulum by hanging a small container of paint from a string. Set it in motion, and gravity takes over, pulling the container back and forth. Paint drips and splashes onto the canvas or paper below. The result? Dynamic artwork reminiscent of rainfall or Jackson Pollock's abstract expressionism.
This activity is multifaceted, combining science and art in a large-scale artistic experience. It demonstrates basic physics principles, like motion and gravity. Because it's process-focused, there's no pressure for a "perfect" piece, making it ideal for all skill levels.
Features and Benefits
- STEAM Learning: Kids visually learn about gravity, motion, and momentum.
- Large-Scale Art: This activity is scalable for impressive artwork. Imagine a giant collaborative mural!
- Unique Results: Each pendulum swing creates a different pattern, making every piece one-of-a-kind.
- Adaptable for All Ages: Adjust complexity by changing pendulum length, paint consistency, or container shape.
Pros and Cons
| Pros | Cons |
|---|---|
| Highly engaging and physical | Requires space and setup (outdoors or garage) |
| Visually demonstrates scientific principles | Potentially messy (use drop cloths!) |
| Creates unique artworks | Needs adult supervision for setup |
| Adaptable for multiple age groups | Paint consistency significantly affects results |
Tips for Awesome Pendulum Painting
- Controlled Flow: Use a plastic cup with a small hole for controlled paint flow.
- Pattern Variation: Experiment with string lengths to change the arc and splash patterns.
- Ideal Paint Consistency: Thin acrylic paint with water for optimal flow and splatter. Too thick, and it won’t drip; too thin, and it becomes watery.
- Protect Your Surroundings: Use drop cloths extending beyond the edges to catch splatters.
From Pollock to Playgrounds
Pendulum painting is rooted in action painting, made famous by artists like Jackson Pollock. This style emphasizes the physical act of painting as a performance. Today, you’ll find versions of pendulum painting in children's museums and interactive science exhibits. STEAM education programs have also embraced it. DIY science entertainers on platforms like TikTok and YouTube have further popularized it, sharing creative variations and inspiring families to try it at home.
This isn’t just a craft; it’s an experience. It's about embracing the unexpected, exploring scientific principles through art, and, most of all, having fun!
Creating a Weather-Themed Indoor Fort
Rainy days can sometimes make outdoor activities difficult. But what if bad weather could actually spark creativity? Building an indoor fort with a weather theme turns a gloomy day into a chance for immersive, imaginative play and hands-on learning. This is more than just tossing a blanket over some furniture; it's about designing and building a cozy escape from the "storm," incorporating architectural and design elements.
Imagine transforming a reading nook into a cloud-watching paradise, complete with hanging raindrop mobiles and comfy pillows. Or maybe a pillow fort becomes an exciting thunderstorm simulation with strategically placed fairy lights mimicking lightning. You could even create a multi-room "weather station" with each area representing a different climate—a sunny beach room, a rainy rainforest room, and a snowy arctic zone. The possibilities are endless!
This activity effortlessly combines crafts and dramatic play. Kids not only construct the fort but also decorate it with weather-themed items. Blue streamers become cascading rain, crumpled paper transforms into clouds, and flashlights represent the sun. The fort becomes more than just a structure; it's a setting for storytelling and imaginary adventures. Check out our article about Hands-On Learning Activities for more creative learning ideas.
The popularity of indoor fort building comes from several sources, including child development experts who emphasize imaginative play, the increasing trend of indoor "camping," and social media parenting communities sharing creative fort designs. Children’s literature, like The Hideaway by Pam Smy, also contributes to this fascination with creating special spaces.
Pros of Fort Building
- Resourceful: Uses everyday household items like blankets, pillows, chairs, and string lights.
- Engaging: Keeps children busy for hours, even days, designing, building, and playing.
- Multi-faceted Learning: Incorporates kinesthetic, visual, spatial, and social learning styles.
- Memorable Experiences: Creates lasting memories and strengthens family connections.
Cons of Fort Building
- Space Requirement: Requires a dedicated area and temporarily changes the room layout.
- Potential for Conflict: Disagreements about design choices can arise in homes with multiple children.
- Clean-up: Can be a little messy, but the fun usually outweighs the hassle!
Tips for Fort Building Success
- Secure Structures: Clothespins or binder clips are great for securing blankets and creating stable forts.
- Light it Up: Flashlights or battery-operated lights add a magical touch and enhance storm effects.
- Plan Ahead: A simple blueprint or even a quick sketch can help with the design and construction.
- Sounds of the Storm: Add weather sound effects from online sources or apps for an immersive experience.
This activity deserves a spot on this list because it offers a rich, multi-sensory experience that encourages creativity, problem-solving, and imaginative play. It transforms a potentially dull rainy day into an adventure, turning your living room into a magical world limited only by imagination.
10-Point Comparison of Rainy Day Craft Ideas
| Idea | 🔄 Complexity | ⚡ Resources | 📊 Outcomes | 💡 Ideal Use Cases | ⭐ Key Advantages |
|---|---|---|---|---|---|
| Paper Mache Weather Mobile | Moderate – multiple steps & drying periods | Household items & recycled materials | Educational, decorative, balanced mobile | Classrooms, nursery decor, science units | Customizable, teaches physics principles |
| Rain Cloud in a Jar Science Craft | Easy – quick setup & visual demonstration | Minimal supplies (jar, shaving cream, food coloring) | Temporary, dramatic demonstration of precipitation | Science experiments, homeschools, science fairs | Fast, engaging, and educational |
| Raindrop Suncatchers | Very simple – minimal mess & immediate results | Basic craft supplies (contact paper, tissue paper) | Bright window décor with light-capturing effects | Preschool projects, classroom decor | Immediate visual impact, safe and accessible |
| Sock Puppets Weather Characters | Moderate – creative and adaptable with optional sewing | Upcycled household materials (socks, felt, glue) | Interactive puppets that spark imaginative play | Puppet shows, therapy tools, home creative play | Eco-friendly, encourages storytelling and creativity |
| Recycled Umbrella Art | Moderate-to-high – requires disassembly & careful work | Discarded umbrella plus cutting & gluing tools | Unique decorative or functional art | Upcycling projects, distinctive home décor | Eco-friendly reuse with unique material properties |
| Indoor Nature Collage from Rainy Day Collections | Moderate – involves collection & preservation steps | Free natural materials & pressing tools | Lasting mixed-media art capturing seasonal nature | Nature journals, art classes, indoor craft projects | Connects with nature, low-cost, and observational learning |
| Rain Stick Musical Instrument | Moderate – balancing craft with sound creation | Basic supplies (cardboard tube, fillers, foil, glue) | Functional instrument producing authentic rain sounds | Music education, sensory play, cultural lessons | Engaging, multi-sensory with cultural enrichment |
| Watercolor Rain Art Techniques | Moderate – experimental techniques with watercolors | Art supplies (watercolor paper, paints, brushes, salt) | Unique, unpredictable rain-themed artwork | Art classes, creative personal projects | Teaches art techniques with creative, experimental processes |
| Splash Artwork with DIY Pendulum Painting | High – messy setup & process-focused experimentation | Enlarged space & specialized supplies (drop cloth, paint) | Dynamic splash art demonstrating physics in motion | STEAM projects, group murals, interactive exhibits | Integrates science and art for an immersive experience |
| Indoor Fort Building with Weather Theme | Medium-to-high – requires space & design planning | Household furniture and fabric items | Immersive, evolving play space with weather features | Indoor camping, theater play, family activities | Fosters design thinking, memorable and adaptable environment |
Time To Dry Off: Wrapping Up Your Rainy Day Crafting
So, you've made it through our list of ten rainy day craft ideas! From weather mobiles to cozy forts, we’ve explored projects for different ages and skill levels. The main takeaway? Rainy days don't have to be dull. With a bit of imagination, simple supplies can become engaging projects.
Remember, adapting these ideas to your needs is key. Have younger children? Simplify the projects and let them explore different textures and materials. Working with older kids or adults? Encourage them to try new techniques and add personal touches. Learning happens through trying things out, so don't be afraid to stray from the instructions.
The crafting world is always changing, with new trends and materials popping up. Upcycled crafts, nature-inspired projects, and personalized designs are just a few examples. Keep exploring, keep learning, and most importantly, keep creating!
Taking Creativity Further With AI
Speaking of personalized designs… want to elevate your rainy day crafting? Imagine making unique coloring pages instantly, designed around any theme. A breakdancing penguin? A unicorn teaching math to dinosaurs? With ColorPageAI, you can bring these ideas to life in seconds!
Whether you’re a parent, teacher, therapist, or just love to color, ColorPageAI offers a platform to generate personalized coloring pages using AI. No artistic skills are needed – just type in your idea. And the best part? You can generate up to five coloring sheets for free. So, ditch the generic coloring books and unleash your creativity with ColorPageAI. Start creating your personalized coloring adventures today!
Turn your kid into the star of the page
Upload one photo and get coloring pages of your own child. Print as many as you like.