Your Guide to Image to Line Art Conversion
September 16, 2025

Turning a photo or illustration into line art used to be a job for a skilled artist with a steady hand. These days? You can get stunning results with AI converters or take full control with software like Photoshop. The basic idea is to strip an image down to its essential outlines, creating a clean, versatile new piece of art from the original.
Why Line Art Is Having a Modern Moment
Line art is way more than just a simple sketch. It’s a timeless art form that’s finding a whole new life in the digital age. When you simplify a complex image down to its core lines, you often end up with something more powerful and memorable. It’s this minimalist punch that explains its recent comeback in branding, social media, and especially in digital products like coloring pages.
This fundamental form of expression has an incredibly deep history. Think about it—the earliest human art wasn't a painting; it was a line. Markings discovered in South Africa suggest we've been using lines to communicate for nearly 75,000 years. From prehistoric caves to our modern screens, the enduring power of a simple line is undeniable.
The Timeless Appeal of Simplicity
So, why does this ancient technique feel so fresh right now? It boils down to clarity and emotional impact. A single line can convey movement, emotion, and form without any distractions. This makes it perfect for so many modern uses:
- Branding: Clean, scalable logos and icons that are instantly recognizable.
- Digital Products: Creating custom coloring pages or unique patterns for print-on-demand merch.
- Social Media: Eye-catching graphics that slice through the noise of a crowded feed.
A line drawing is a distillation of an idea. It removes all the noise—color, shading, texture—and leaves only the essential form, which is why it often feels more direct and honest.
The rise of AI has thrown the doors wide open, making the image to line art transformation accessible to everyone, not just pros with years of tracing experience. You no longer have to spend hours painstakingly tracing a photo. Now, you can generate crisp line drawings in seconds, unlocking creative possibilities for hobbyists and professionals alike. It's a journey not unlike the history of coloring pages themselves, which have evolved from simple newspaper fillers to intricate, personalized designs we can create on demand.
So, you're ready to turn a photo into line art. The first big decision is how you're going to do it. You’re basically standing at a fork in the road. One path is the AI superhighway, built for speed. The other is the scenic route of manual software like Photoshop, which gives you absolute control over every twist and turn.
What's right for you really boils down to what your project needs most: speed, precision, or maybe a little of both.
AI Converters: The Need for Speed
Think of AI converters as the sprinters of the art world. You upload your image, click a button, and—bam!—you’ve got line art in seconds. It’s an incredible time-saver.
This approach is perfect when you need to brainstorm ideas quickly, whip up some simple coloring pages, or just get a result without getting bogged down in technical details. The trade-off? You give up fine-tuned control. Sometimes the AI misinterprets complex areas, leaving you with weird digital artifacts or wonky lines.
Manual Software: For the Perfectionist
On the flip side, using software like Photoshop is more like being a sculptor with a chisel. It’s a slower, much more deliberate process, and yes, there's a learning curve. But the payoff is huge.
You have complete authority over every single line, dot, and curve. This hands-on method is the go-to for professional illustrations, highly detailed coloring books, or any project where the final quality has to be absolutely flawless. The only real downside is the time you'll need to invest to get the job done right.
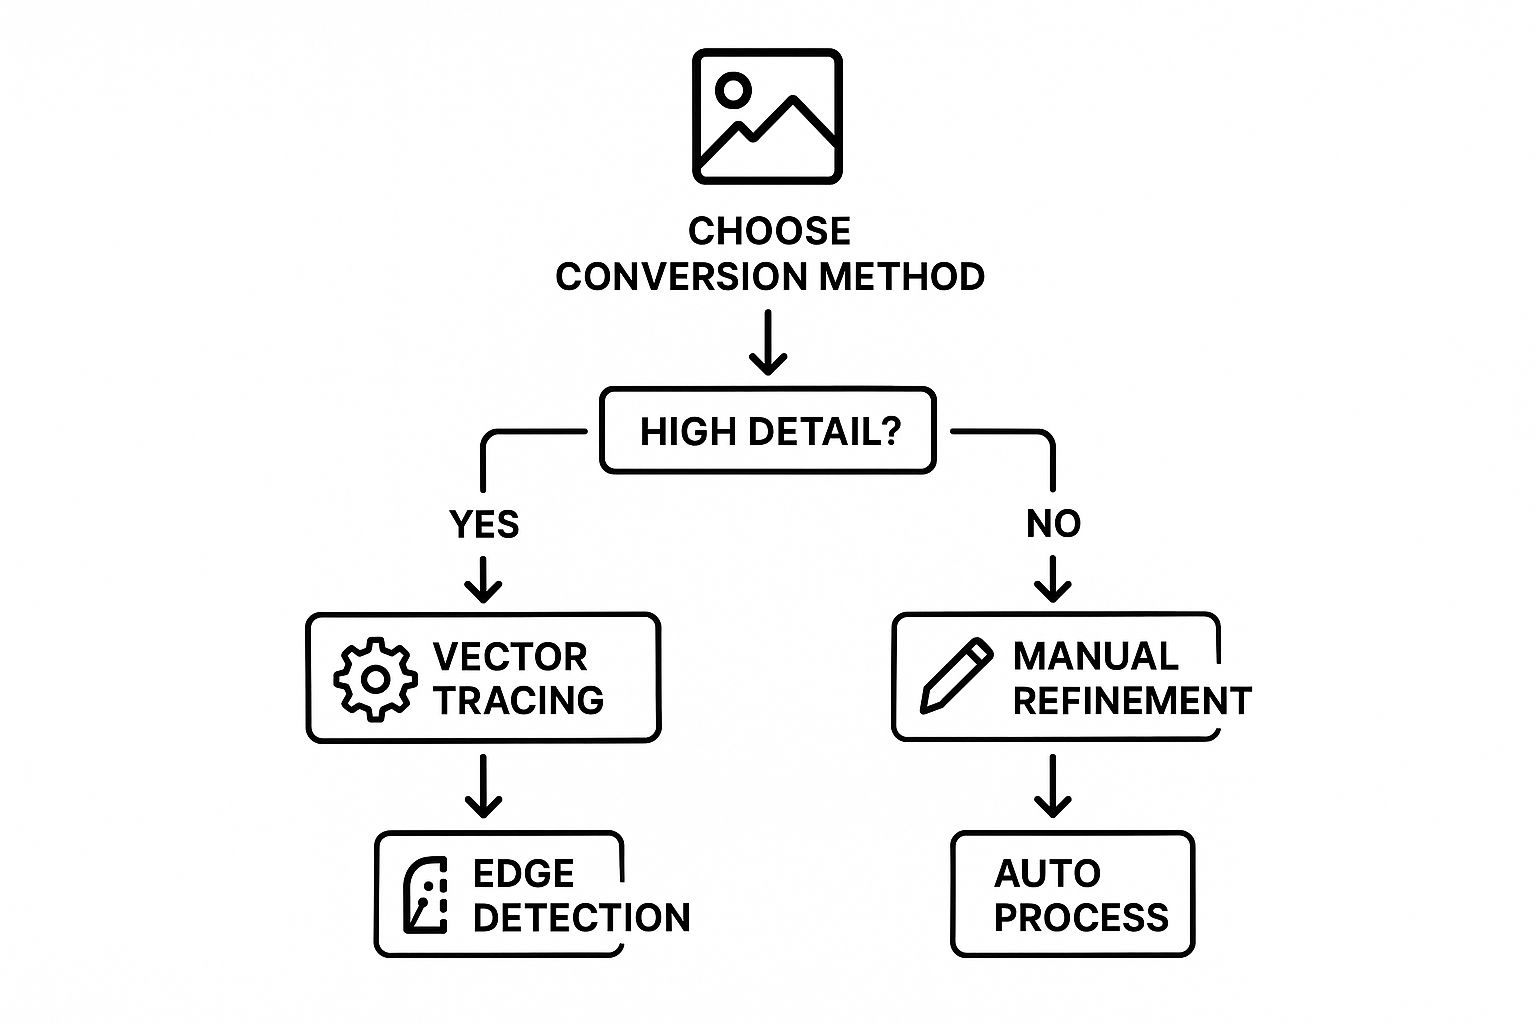
As you can see, the more detail and control you need, the more you’ll lean toward manual methods. For simpler jobs, AI edge detection is often more than enough.
To make the choice even clearer, here's a quick side-by-side look at the two approaches.
AI vs Manual Line Art Conversion
This table breaks down the key differences between AI-powered tools and manual software, helping you pick the right path for your specific project.
| Feature | AI-Powered Tools | Manual Software (e.g., Photoshop) |
|---|---|---|
| Speed | Extremely fast (seconds to minutes) | Slow and meticulous (hours) |
| Control | Limited; results depend on the algorithm | Complete control over every line |
| Skill Level | Beginner-friendly; no artistic skill needed | Intermediate to advanced; requires practice |
| Best For | Quick mockups, simple coloring pages, concept art | Professional illustrations, detailed print work |
| Cost | Often free or has low-cost subscription plans | Typically requires a software subscription |
| Consistency | Can be hit-or-miss on complex images | Consistent results based on user skill |
Ultimately, both methods have their place. It all comes down to what you're trying to achieve with your final piece.
Your choice isn't just about the final image; it's about the creative journey. Do you want to direct the process from a high level, or do you want to be in the trenches, shaping every curve and endpoint yourself?
There's no single "best" method here. For a quick social media graphic, an AI tool is a no-brainer. But for a print-quality illustration that’s going to be a centerpiece, the meticulous control of manual editing is non-negotiable.
In fact, many artists I know use a hybrid approach. They’ll generate a base with an AI tool to save time, then pull it into Photoshop or Illustrator for manual refinement. It’s a smart way to get the best of both worlds.
Getting Instant Results with AI Tools
When you need quality line art without the hours of tedious tracing, AI-powered converters are your secret weapon. These tools are built for speed and simplicity. You just upload a photo, pick a style that catches your eye, and let the algorithm do the heavy lifting in seconds.
Honestly, it’s the quickest path from a full-color image to a clean, ready-to-use outline.
Most tools I’ve used have a dead-simple "upload" button. Once your image is loaded, you’re usually presented with a gallery of style options. This is where the fun really starts. Are you going for a thick, bold outline that would be perfect for a kid's coloring page? Or maybe a delicate, sketchy look for a more artistic project? The choice is yours.
The adoption of these tools has absolutely exploded. It's not uncommon for modern AI converters to offer over 15 customizable line art styles, which makes them incredibly versatile. This is all part of a bigger trend, with AI use in creative fields growing by more than 40% every year because it just rips down the technical barriers of traditional software.
Choosing the Right Photo for AI
Now, while the AI is incredibly smart, it isn't a mind reader. The quality of your final line art is directly tied to the quality of the photo you feed it. To get the best results from any image to line art converter, you have to start with a strong source photo.
Here's what I've learned works best:
- High Contrast is Your Friend: Photos with a clear difference between the subject and the background are gold. A black dog against a white wall is way easier for the AI to process than a golden retriever on a sandy beach.
- Clean Backgrounds Win Every Time: A busy, cluttered background is just going to confuse the algorithm, leading to messy or broken lines. Always try to use photos with simple, uncluttered backdrops.
- Good Lighting is Non-Negotiable: Clear, even lighting helps define the edges of your subject perfectly. Steer clear of photos with harsh shadows or super bright, blown-out highlights, as they can hide important details from the AI.
Think of the AI as a sketch artist who needs a clear reference. The better you can define the subject in your original photo, the cleaner and more accurate your final line art will be.
Once the AI has worked its magic, you can often make small tweaks. Many tools let you adjust things like line thickness or the level of detail. From there, exporting is usually just a single click. This whole workflow is a lifesaver if you want to quickly create a coloring page from a photo without getting bogged down in complicated software.
If you’re curious about the tech behind it, understanding the "image to prompt" process can give you a deeper appreciation for how AI interprets visual data. There's a great breakdown in this Image to Prompt: A Practical Guide to AI Art Generation.
Browse free coloring pages
Hundreds of ready-to-print pages, plus a generator that makes any page you can describe.
Want Total Control? Go Hands-On with Photoshop
Sometimes, AI tools just don't cut it. For those moments when you're a perfectionist and every single line has to be just right, it's time to roll up your sleeves with an old friend: Adobe Photoshop.
If you crave absolute precision, Photoshop gives you a manual, hands-on path to convert any photo into clean, professional-level line art. It might sound a little technical, but the core process is surprisingly simple once you see it in action. We're not just slapping on a generic filter here; this is about using layer-blending magic to pull the essential lines right out of your image.
The Core Layer-Blending Trick
First things first, open your image in Photoshop and immediately duplicate the background layer. This is non-destructive editing 101—it keeps your original photo safe and sound.
Now, take that new layer and desaturate it, turning it into a simple grayscale version. Here's where the real fun begins. Duplicate the grayscale layer one more time so you have three layers in total.
Select that top layer and invert it (you can use the shortcut Ctrl+I or Cmd+I). It’ll look like an old-school photo negative. The key to this whole technique is changing this layer's blending mode from "Normal" to Color Dodge. Don't be alarmed when your canvas turns completely white—that’s exactly what's supposed to happen.
This works because the Color Dodge blending mode is essentially canceling out the inverted layer below it. When we apply a slight blur, only the darkest pixels—the lines you want to keep—will peek through.
To reveal your artwork, you just need to apply a Gaussian Blur to that top inverted layer. Go to Filter > Blur > Gaussian Blur and start with a very small radius. As you slowly drag the slider, you'll see the outlines of your image magically appear.
Dialing in Your Lines with Adjustments
What you have now is probably a faint, greyish sketch. To get those lines looking bold and crisp, we'll call in the big guns: adjustment layers.
Create a new Levels or Curves adjustment layer and place it at the very top of your layer stack. By dragging the sliders, you can "crush" the grays and push the blacks, making your line art pop off the page. It's incredibly satisfying to watch it transform.
If you want to get more comfortable with these kinds of edits, it’s worth taking the time to master essential Photoshop tools for image editing.
For the final polish, grab a soft brush or the eraser tool to clean up any smudges, stray pixels, or artifacts. This last step is what separates a decent conversion from a truly great one. The result is a clean, professional line drawing that’s perfect for any project—especially if you're learning how to make coloring pages that look sharp and print beautifully.
Alright, you’ve used AI to generate some amazing line art. That’s a huge first step, but we’re not quite at the coloring page finish line yet. A great piece of art needs a few technical tweaks to become a truly great coloring experience.
The goal here is to make something that’s a joy to color, not a digital headache.
The single most critical detail? Make sure your lines are clean and completely closed. Seriously, zoom in and check. Any tiny, invisible gap will cause digital "fill" or "paint bucket" tools to bleed color all over the page. It's a classic rookie mistake that turns a fun coloring session on a tablet into a mess of frustration. A few minutes of manual cleanup makes all the difference.
Another pro-level touch is to play with your line weight. Instead of one uniform thickness, varying your lines adds a surprising amount of depth and visual pop. Thicker outlines can make the main subject stand out, while finer lines are perfect for delicate details. It subtly guides the eye and makes the final colored piece look far more dynamic.
Getting It Ready for Screen or Printer
Now, let's talk about the final file. How you prep it depends entirely on whether it's destined for a screen or a printer.
If there’s any chance someone will print your creation, setting the resolution to 300 DPI (dots per inch) is an absolute must. This is the industry standard for a reason. Anything less might look okay on your monitor but will come out of the printer looking fuzzy, pixelated, and just plain disappointing.
Think of it this way: 300 DPI is the difference between a crisp, professional page you'd find in a bookstore and a blurry copy from a ten-year-old office printer. Don't let a low resolution ruin your hard work!
Finally, you need to pick the right file format.
- For digital sharing (like on a blog or social media), PNG is your best bet. It handles sharp lines beautifully and, most importantly, supports transparent backgrounds.
- For printing, PDF is the undisputed champion. It locks in the scale and quality, ensuring that what you see on your screen is exactly what prints out. It’s a universal format that anyone can open and print at home without any fuss.
A Few Common Bumps in the Road
Even with the best tools, you're bound to hit a few snags when turning a photo into line art. It’s all part of the creative process, so let’s walk through some of the most common issues I see pop up.
The Source Image is Everything
One of the biggest hurdles, hands down, is starting with a low-quality image. If your original photo is blurry, dark, or pixelated, both AI and manual methods will have a tough time finding clean edges. You'll end up with a messy, incomplete drawing. My best advice? Always, always start with the sharpest, highest-resolution photo you can get your hands on. It makes all the difference.
Taming an Overeager AI
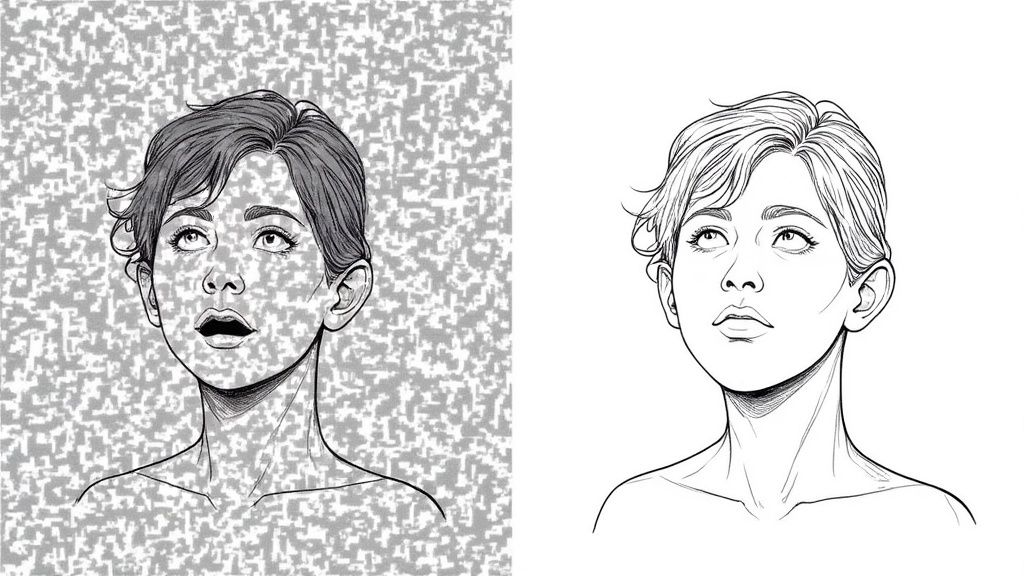
Another classic issue is what I call "over-processing." This is when an AI tool gets a bit too excited and creates way too many lines, making the final piece look cluttered and chaotic. Most converters have a "detail" or "complexity" slider. Don't be afraid to dial it back. Often, simplifying the output gives you a much cleaner, more elegant result.
Why Do My Lines Look So Jagged?
Ever seen those jagged, "stair-stepped" lines? That's a classic case of aliasing, and it usually boils down to low resolution.
For anything you plan to use digitally, make sure your canvas is a decent size—I'd say at least 1000 pixels wide. If you're printing, the golden rule is 300 DPI. No exceptions. That's your ticket to guaranteeing smooth, crisp lines on paper.
It's also just fascinating how our brains work with lines. Research has shown that the human visual cortex can decode line drawings almost as fast as full-color photos, even when up to 50% of the line data is missing! It's a great reminder of how our brains are wired to "fill in the gaps," which really highlights how crucial those key contours are. You can read more about how our brains perceive line drawings here.
What's the best file format to use? Simple. For web and digital coloring apps, go with PNG to keep your backgrounds transparent. For printing, it's PDF all the way. It locks in the quality and scale, ensuring what you see on screen is what you get on paper.
Once you know what to look for, you can troubleshoot these little issues in a snap. It makes the whole image to line art process a lot smoother and, frankly, a lot more fun.
Ready to skip the troubleshooting and create your own amazing coloring pages in seconds? With ColorPageAI, you can turn any idea into a high-quality, printable design instantly. Just type your idea, and our AI brings it to life. Go ahead and get started today—your first five coloring sheets are on us
Browse free coloring pages
Hundreds of ready-to-print pages, plus a generator that makes any page you can describe.